![]() This guide covers issues with WordPress cache plugins and site migration. By default WordPress doesn’t have it’s own caching system. Popular plugins for this are W3 Total Cache, WP Super Cache, and WP Fastest Cache. The basics of how each plugin handles caching is similar enough. This guide is going to cover WP Super Cache but should be relevant for all.
This guide covers issues with WordPress cache plugins and site migration. By default WordPress doesn’t have it’s own caching system. Popular plugins for this are W3 Total Cache, WP Super Cache, and WP Fastest Cache. The basics of how each plugin handles caching is similar enough. This guide is going to cover WP Super Cache but should be relevant for all.
This issue occurred when I was migrating my site. I was moving my WordPress install from one server to another. The operating system, directory structure, and files were exactly the same as before. This particular move involved going from one cPanel server to another. For this guide, I will use example.com for the domain and /home/example/public/ for the directory.
Because the server was setup exactly the same, I just assumed it would work. I’ve done many WordPress installs and migrations. Each one was relatively similar. Take a full backup of the site, including all files and databases. Then copy the files and database to the new server. Update the wp-config.php file to use the new database settings. And poof, you’ve got a copy of your site.
This time, everything worked from my WordPress migration, except the cache plugin. WP Super Cache showed the error, “Error: Your cache directory (/home/example/public/wp-content) did not exist and couldn’t be created by the web server.” Then it recommends checking the permissions. Ending the message with “Cannot continue… fix previous problems and retry.” So of course, the first thing I did was update the permissions.
At this point, please please take a backup of your site. If you’ve got automatic backup, then good job and skip down to Change File Permissions. If not, please take a manual backup at this time. It’s good practice to regularly backup your website files and database. All the content of your WordPress site is valuable! Also, if something goes wrong you can easily revert to a backup. You’ve been warned!
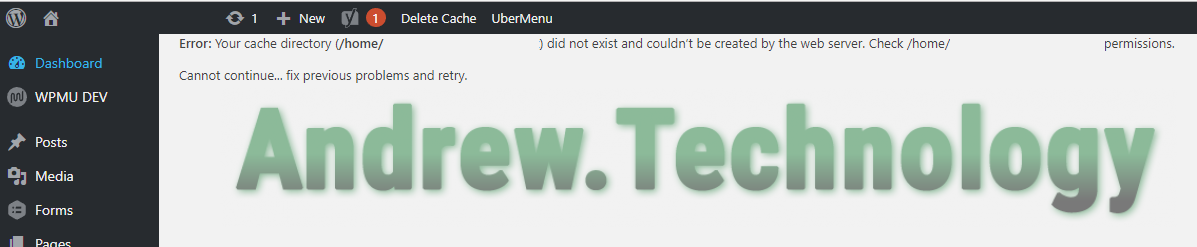
WP Super Cache Error: Your cache directory /home/example/public/wp-content did not exist. Cannot continue… fix previous problems and retry.
Change File Permissions for WordPress wp-content Folder
You need software installed to access the files of your WordPress site. I prefer to use FileZilla for my (S)FTP needs but any FTP client will work. Using (S)FTP software, navigate to where your WordPress site is installed. For the example its /home/example/public. This is the root of my example site. Your root will be different. It’s where all the files for your WordPress site are located.
Once you’re at the site root, right click the “wp-content” folder. A drop down menu appears. At the bottom of the list is “File permissions…”, click that. A new permissions box pops up. In the Numeric value input type: 775. Then Check “Recurse into subdirectories.” Under that pick the ratio “Apply to directories only.” Finally, hit OK. Wait for it to finish, which could take longer depending how big your site is.
Here is the breakdown of actions we just did. I’m also going to include the commands in case you want to do this using SSH. That is more advanced though, so ignore those commands if you are inexperienced:
- Change directory to the root /home/example/public – cd /home/example/public
- Set permissions of /home/example/public/wp-content – chmod 755 wp-content
- Set permissions of all directories bellow wp-content folder – chmod 755 -R wp-content (added recursive command, you could just run this instead of previous command)
The last step takes longer depending on how many folders are stored under wp-content. In other words, if you’ve got a log of plugins or media library uploads. It has to read all the directories and change each one. The console of your FTP client will scroll telling you this information. Once it’s done scrolling, you’ve successfully changed all the permissions.
Updating wp-cache-config.php & advanced-cache.php Files to Fix WP Super Cache
Just changing permissions did not work for me. I had to do some other tweaking to my WordPress install. Upon researching the topic, many suggested updating two files. They suggest modifying the wp-cache-config.php and advanced-cache.php files. But, this is only helpful if you’ve changed the file structure. Perhaps, you moved to a new hosting provider and they use a different file structure than you’re previous. Like in the the example root. It would go from /home/example/public to /var/www/example/public. If this is the case for you, then follow these steps, if not jump down to Deleting wp-cache-config.php & advanced-cache.php Files.
- Navigate to your WordPress site root and then the wp-content directory
- Copy the wp-cache-config.php & advanced-cache.php files to your local computer
- Open both files in a text editor
- Search for the old WordPress install directory, like for example /var/www/example/public
- If you got search hits for this then you do actually need to update to your new server’s file path. If you go no hits then go to the last step, Deleting wp-cache-config.php & advanced-cache.php Files.
- Use find and replace functionality. Search for your old site’s structure and replace with the new. For example, search for “/var/www/example/public” and replace with “/home/example/public”. Save both files.
- Upload them back to your server using (S)FTP.
In theory this could fix the issue. Refresh the WordPress admin. If the cache plugin error is gone, then congrats your WP cache plugin is fixed. If the error priests, then keeping reading.
Deleting wp-cache-config.php & advanced-cache.php Files to Fix WordPress Cache Plugin
This is the last solution to fix a WordPress cache plugin problem. You’ve gone through all the other steps. You’ve changed the permissions of the wp-content folder. Your new server is setup exactly the same as the old. Essentially, your file structure did not change in the migration like myself. Then follow these steps:
- First, disable your cache plugin from the WordPress admin. In my case it’s WP Super Cache. Just search for the word “cache” if you’re not sure and disable that plugin.
- Using FileZilla, or any (S)FTP account, navigate to the wp-content folder. Then, delete wp-cache-config.php and advanced-cache.php files.
- Refresh your (S)FTP client to double check those files are gone.
- Refresh your WordPress site or admin section.
- Last, enable your cache plugin again. Like WP Super Cache, W3 Total Cache, WP Fastest Cache, etc..
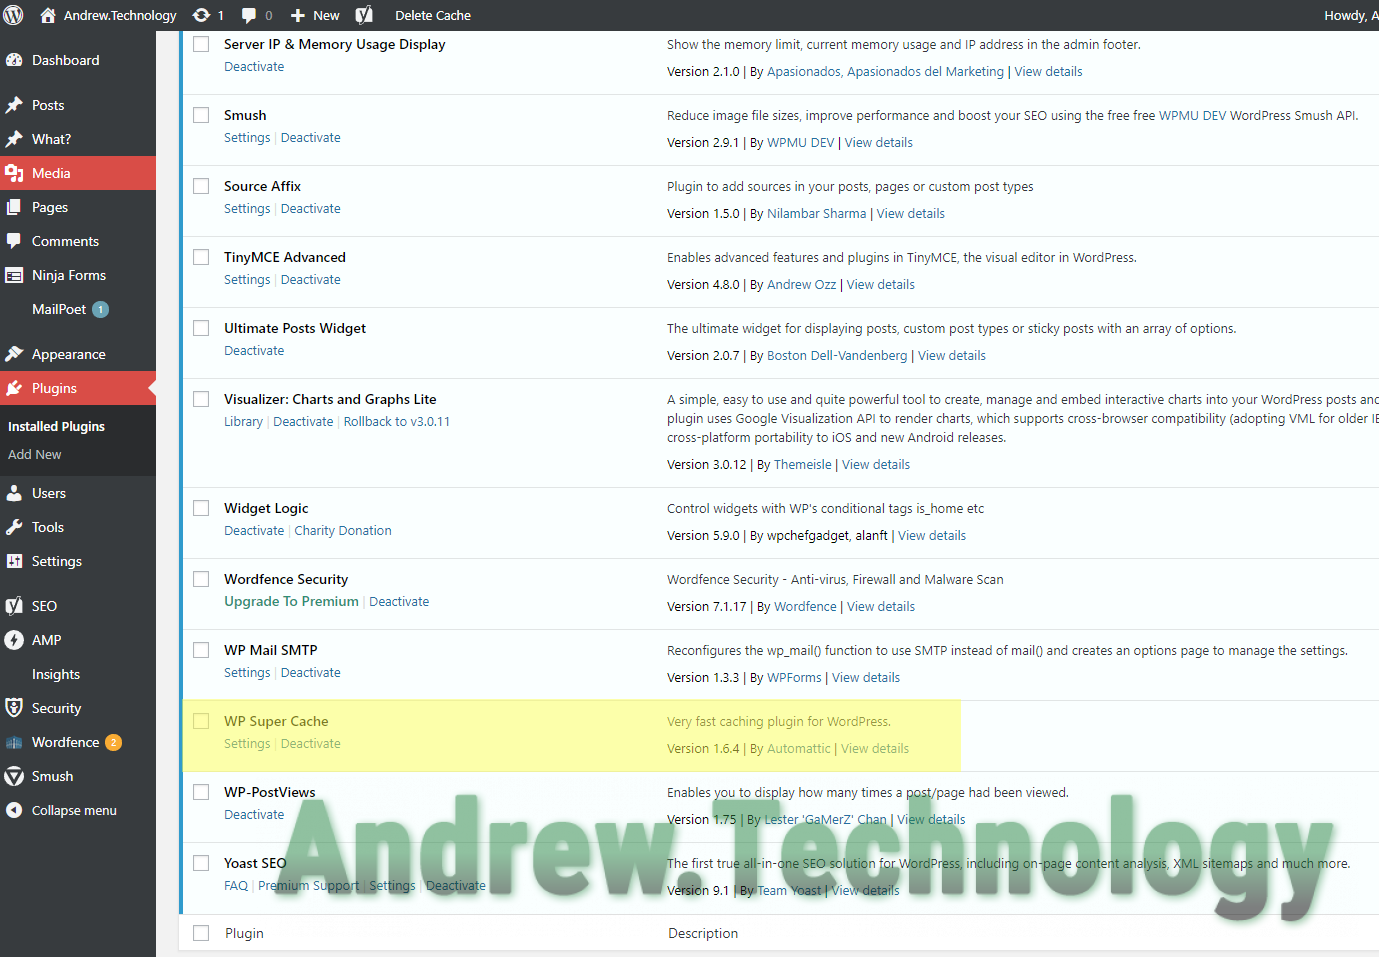
WordPress admin plugins with WP Super Cache highlighted
Basically, we are turning the caching plugin off. Deleting the common cache files: wp-cache-config.php and advanced-cache.php. Then, turning the same WP cache plugin back on. Reactiving the cache plugin recreates those common files.
The wp-cache-config.php & advanced-cache.php will be brand new. The cache settings will be changed to the defaults. Obviously, you’ll need to update your cache settings. But, deleting those files is what fixed my problems. Following these final steps eliminated the WP Super Cache error from my admin. Once I got my cache settings back to my liking and poof everything my WordPress caching plugin worked again. Feels good.
Let me know in the comments if this worked for you! Thank you for reading.
Leave a Reply